Physics Project 3 – Roller Coaster
Daily Journal
Day One – Sketched a drawing of the roller coaster
Made a shopping list for the materials needed to build the project
Day Two – Purchased all materials needed (note: all measurements are in inches)
|
Material |
Type |
Purpose |
|
Cardboard |
Any (at least 30 x 35 in area) |
Covers and walls of the roller coaster |
|
Aluminum |
Rolled Flashing – Economy 10 x 10 |
Path of the roller coaster |
|
Hot Glue Gun & Glue Sticks |
Any |
Pasting the items together |
|
Styrofoam |
Any |
Stretch out the walls of the coaster |
|
Tape |
Clear is preferred |
Pasting the items together |
|
Wood |
Rectangular 7 x 33 |
Base of the finishing product |
|
Hot Wheels |
Any |
For testing |
|
Golf Ball |
Regular |
For testing |
Day Three – Cut out the covers / walls for the roller coaster
| beginning with the basic form of the loop | |
| then cut out the runway and the second elevation |
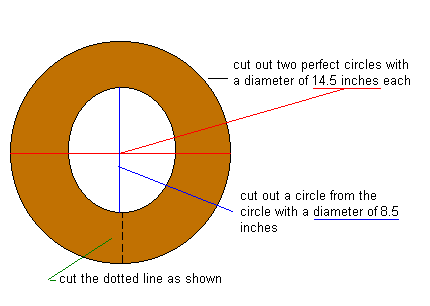
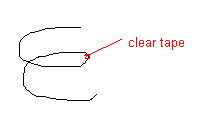
| pasted one end of the circle to the other end of the other circle with clear tape (if taped correctly, you should form a spiral) | |
| pull gently outward on both side of the spiral, you should see the basic form of the loop of your roller coaster! |
Day Four – Built roller coaster runway and the second elevation
| use two pieces of cardboard and cut out the walls of the roller coaster (begin with the second elevation) |
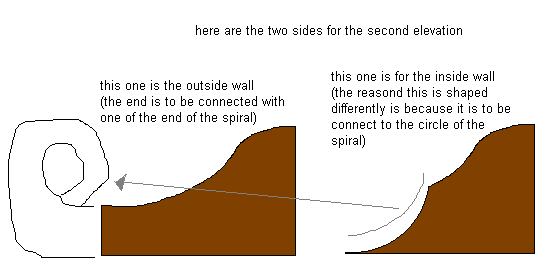
| use Styrofoam to extend the walls (by shaping out the same curves of the wall and paste it between the walls with a hot glue gun) |
Day Five – Used Styrofoam to extend the loop
| the easiest way to do this is to cut out 5 or 6 (3 x 2.5) rectangles | |
| then paste them along the loop with hot glue |
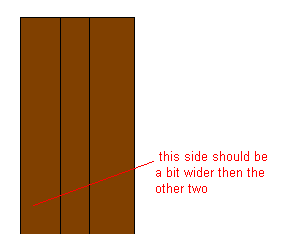
Day Six – Created the runway for the roller coaster
| cut a 30 x 10 rectangle from cardboard | |
| fold the cardboard as shown below |
| paste with either tape or hot glue to the other end of the spiral, similar to the procedure used for pasting the 2nd elevation |
| use Styrofoam, if needed, to even the path from the runway to the spiral |
Day Seven – Applied the inside lining for the entire roller coaster
| make sure you ware a pair of special gloves to avoid cutting yourself | |
| cut out about 2.5 wide and 75 ~ 80 inches long of the aluminum | |
| paste the lining (aluminum) along the previously pasted Styrofoam rectangles | |
| use Styrofoam under the aluminum, if needed, to form a smooth path for the roller coaster | |
| allow the hot glue to dry |
Day Eight - Attached the finishing product to a base for free-standing purposes
| use the 7 x 33 wood | |
| use hot glue to attach the roller coaster to the wood | |
| add more weight on the wood if needed to support the roller coaster from tipping | |
| decorate the final product if desired |
Project is done!
