
Physics Project
Toothpick Bridge – Journal
Kristen Zhang
1999
![]()
Day One: |
Prepare materials for the bridge. Items include few boxes of round wood toothpicks, white glue, ruler, pencil, and papers
Record all the steps of today’s procedure.
Day Two: |
Began with the bottom outline of the bridge.
First cut off the two ends of each toothpicks for easy gluing surface later (about 3cm each).
Form a stick about 35cm by gluing the prepared toothpicks from end to end.
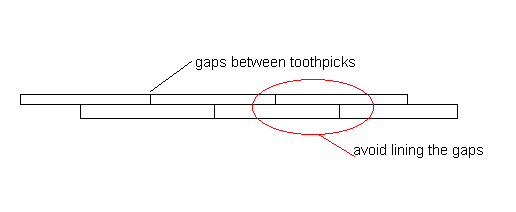
Then prepare three of the same length sticks and glue them along the first toothpick stick (avoid lining up the gaps between each toothpicks to prevent forming a weak spot on the bridge).
<See below diagram for example>
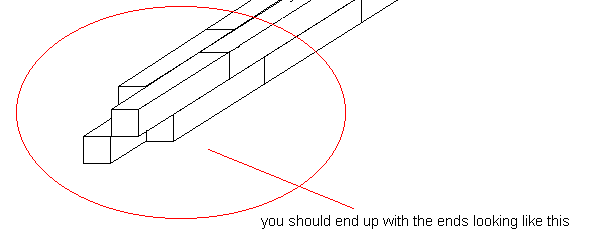
<Ending View of the Bridge so far>
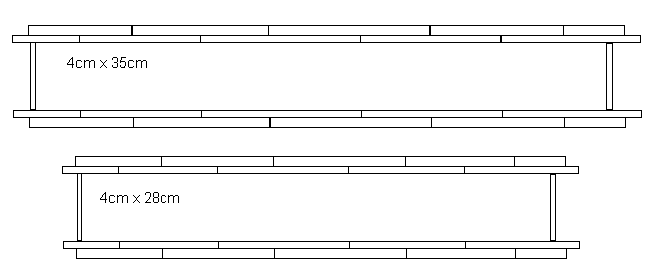
Repeat the previous processes and make one more of the same length (about 35cm), two more of a shorter length (around 28cm) as the top outlines, and four of the shortest length (1 inch) for the legs of the bridge.
Leave the glue to dry after finishing with the toothpicks.
Record all the steps of today’s procedure.
Day Three: |
Now that the glue is totally dried, I cut out four single toothpicks about the length of 4cm each to use for connecting the previously prepared outlines (using the required type of glue).
Now, I have two rectangles (one of them is 4cm x 28cm, the top outline of the bridge, and the other is 4cm x 35cm, the bottom outline of my bridge)
<See diagram below for what I
have so far>
Paste the each leg of the bridge at the four different corners of the longer rectangle
– The bottom outline of the bridge.
Make sure the legs are equal lengths, to avoid the bridge to be unbalanced.
Done for today, leave items to dry.
Record all the steps of today’s procedure.
Day Four: |
Connect the top outline with the bottom outline of the bridge by preparing the sidebars for the bridge.
Cut out some doubled and single toothpicks with slanted ends
– See diagram of example:
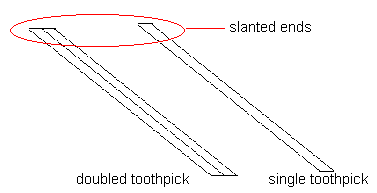
(Note: The doubled toothpicks are formed by gluing two single toothpicks together.)
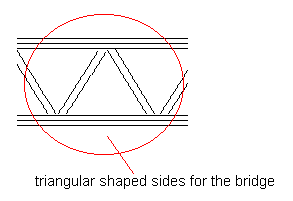
Using the various types of the above toothpicks, connect the top and the bottom outlines of the bridge. (Glue the toothpicks with a wave-like style, with one pointing upward left and upward right for the next one…).
For the best result, these toothpicks, that are connection the top and the bottom of the bridge, should form triangular shape designs as the sides of the bridge.
Repeat the same process for both sides of the bridge.
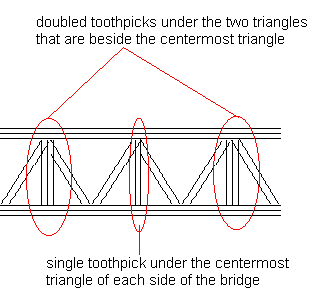
Under the centermost triangle of each side, I placed a single toothpick (perpendicular angle bisector) for an extra support on the bridge.
Then I placed a doubled toothpick under the two triangles that are beside the centermost triangle of each side (total four), for a better support on the bridge.
Done for today, leave items to dry.
Record all the steps of today’s procedure.
Day Five: |
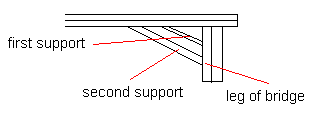
Add extra support for the legs of the bridge. Used two single toothpicks to create more support and strength for the legs.
<See Diagram for Example>
Add on a center top supporting bar. (Locate it in the middle of the top outline of the bridge)
Leave the items to dry.
Record all the steps of today’s procedure.
Day Six: |
Create the final step for my bridge: build the roadbed. Prepare 21 of 4cm toothpicks with their ends cut off.
In order to accurately and evenly place the toothpicks to form a roadbed, use the gaps of the outlines as a guide.
Leave items to dry and the bridge is finally finished!
Record all the steps of today’s procedure.
Prepare Blue Print and Print out Journal.
|
~ See the Blue Print of the Bridge for a detailed look! ~
![]()
Kristen Zhang
1999
